Elements Group
Vertex  / Edge
  / Polygon
  / Object
There are 4 types of elements you can select and transform.
I think these tools are used most frequently in UModeler so they are located at the top of the scene view. Firstly let me explain the Object Tool. With this tool you can select other objects, and move/rotate/scale them, which is same as Unity Object Mode.
Now let’s see Vertex Tool, Edge Tool and Polygon Tool.
A mesh consists of vertices, edges and polygons. We call them elements.
And there are gizmos which are displayed on the center of the selected elements and used for moving, rotating and scaling elements. They look like the following image roughly.
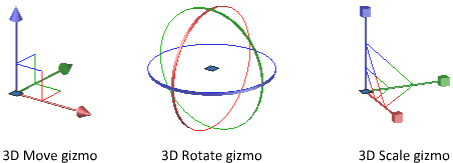
Source - Autodesk - About using 3D Gizmos
You can select vertices and move/rotate/scale them with the Vertex Tool. The Edge Tool can make you select edges and move/rotate/scale them. Using the Polygon tool, polygons can be selected and moved/rotated/scaled.
Note
When you rotate and scale elements, the pivot position is usually the center of them. But when the 3D cursor is on, the cursor position will be the pivot position.
Basically selection of each element can be done by placing the mouse cursor there and pressing LMB. And LMB dragging from an empty space will draw a rectangle and select elements inside the rectangle.
Tip
CTRL and pressing LMB on an element.W E or R changes the current gizmo like Unity.SHIFT while dragging a gizmo, the selected elements are extruded.V while dragging the move gizmo and moving to another vertex, the selected elements’ selected axis’s value will be snapped to the vertex. This is called 1D snappingSHIFT + CTRL while dragging a gizmo, the vertices consisting of the elements will be split.LMB Double click on a polygon will unwrap and stick it. This is called Auto Layout. Click here to get more info about it.Tip
V(ertex) Snapping
Moving the selected vertices/edges/polygons holding V allows their pivot position to be snapped to a vertex under the mouse cursor.
Note
The key for 1D Snap has been changed from Ctrl to V since UModeler 2.8.4
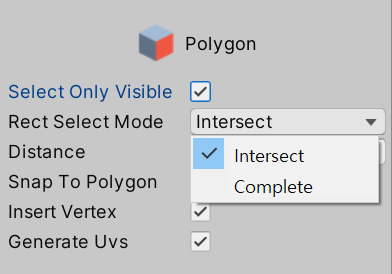
Rect Select Mode property has been added since UModeler 2.8.5f2.
Intersect : Select elements that are entirely or partially inside the drag-rectangle.
Complete : Only select elements that are contained entirely within the drag rectangle.
Properties
- Select Only Visible
If on, Selects only visible vertices/edges/polygons from a camera. Occluded elements from other polygons will not be selected. This is available only when the game object has MeshCollider component.
- Distance
How distant the selected elements move. This is only available as the move gizmo is enabled.
- Snap To Polygon
An edge is snapped to a close polygon within a specific distance. This is only available as the edge is being moved.
- Snap To Vertex
A vertex is snapped to the other close vertex within a specific distance. This is only available as the vertex is being moved.
- Move To Cursor
Moves the current selected elements to the 3D cursor position.
- Insert Vertex
Inserts a vertex to an adjacent edge to avoid T-junction.